

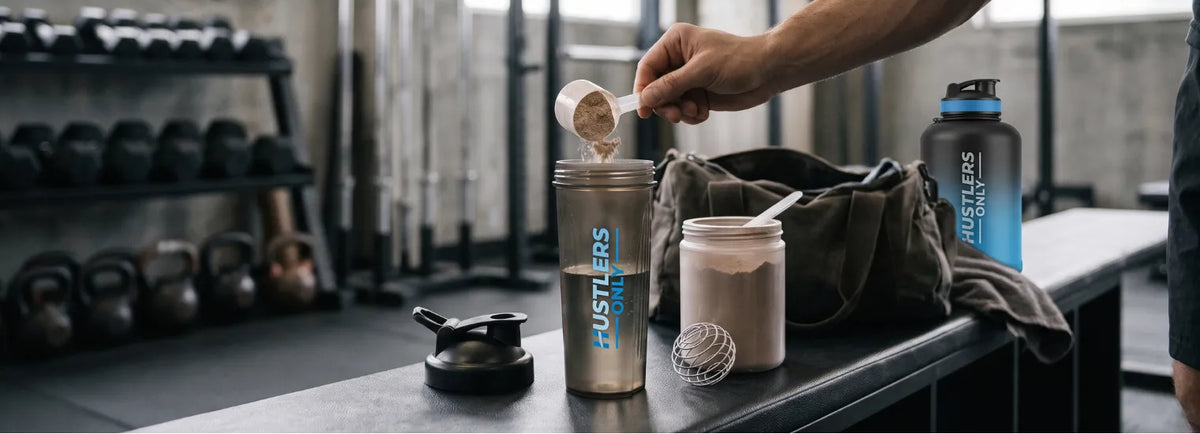
Always pour water or milk into your shaker bottle first, then add your scoop of protein powder on top. Adding liquid first stops dry powder from packing into the bottom corners of the cup, keeps the millilitre markings accurate, and lets every particle hydrate from all sides. Fill 250 ml to 350 ml of cool or room-temperature liquid, drop in a mixing ball, add your powder, and shake for 20 to 30 seconds.
Walk into any gym locker room in Dubai after an evening session and you will see lifters banging the base of their shaker bottles against their palms. They scooped dry whey into an empty cup before leaving home, poured cold water from the gym dispenser on top, shook for half a minute, and still ended up with a thick layer of chalky paste glued to the bottom.
Fixing a lumpy shake requires zero extra time and no kitchen blender. Changing the order in which your ingredients hit the bottle solves the problem on the first try.
Why protein powder clumps when you add it first
Protein powder does not dissolve the way table sugar or instant coffee does. Whey, casein, and plant proteins contain chains of amino acids and fat molecules with both water-loving (hydrophilic) and water-repelling (hydrophobic) regions. To mix cleanly, those particles need water surrounding them on all sides at the same time.
Four separate problems happen the moment you dump dry powder into an empty cup before pouring in your liquid:
-
The wet outer shell traps dry powder inside: When water lands on top of a pile of dry powder, only the top millimeter gets wet. That outer layer absorbs moisture and turns into a sticky, gel-like skin. The skin seals off the dry core underneath, keeping water out no matter how hard you shake the bottle.
-
Water weight compresses the base: As you fill the bottle, the weight of 300 ml of liquid presses down on the dry scoop sitting at the bottom. The powder packs tightly into the bottom edges of the cup like wet sand on a beach.
-
Volume displacement ruins your liquid ratio: The millilitre and ounce lines printed on the side of a shaker bottle measure liquid volume from the bottom up. One or two scoops of protein powder take up 40 ml to 80 ml of space at the base. If you add powder first and then fill water to the 300 ml line, you are putting in far less water than your supplement label calls for, leaving you with a thick, gritty sludge.
-
Trapped air creates a foam surge: When a clump sticks to the bottom, most people shake the bottle vertically as hard as they can. Frantic up-and-down shaking whips empty air into the liquid before the protein has dissolved, creating a pressurized head of foam that spills over your hands when you pop the flip cap.
What most gym-goers try (and why it fails)
Once a dry pocket of protein sets against the base of a bottle, common locker-room fixes rarely save the drink:
-
Stirring with a spoon or butter knife: A spoon pushes the sealed lump around in circles without creating enough shear force to break the outer gel layer.
-
Shaking harder for two minutes: Extra force after the shell has formed only beats more air into the whey, turning the top half of the bottle into froth while the bottom stays chalky.
-
Pouring in more water afterward: Topping up the bottle dilutes the flavor and makes the drink watery, while the hardened lumps simply float to the top.
-
Using a kitchen fork or hand whisk: Mash-mixing with a fork in a glass works at home, though nobody wants to carry extra cutlery in a gym bag or wash sticky utensils in a locker-room sink.
The right sequence: how to mix a smooth protein shake in 6 steps
Follow this exact order whether you are mixing whey isolate, whey concentrate, mass gainer, or vegan protein:
-
Start with a clean bottle: Leftover dry residue on the inside walls gives fresh powder a rough surface to grab onto and starts new clumps.
-
Pour in 250 ml to 350 ml of room-temperature or cool liquid first: Fill your water or milk to the measurement line before touching your protein tub. Liquid at the bottom gives you an accurate volume reading and creates a moving cushion that keeps powder off the base.
-
Drop in your mixing ball: Place your stainless steel wire whisk or blending ball into the liquid so it sits below the powder layer.
-
Add a level scoop of protein powder on top: Let the powder fall onto the surface of the water. Instead of compacting at the bottom, the particles spread out and begin hydrating from every side as they sink.
-
Close the lid and shake immediately for 20 to 30 seconds: Do not let the powder sit undisturbed on top of the water for several minutes, or the bottom edge of the floating scoop will form a crust. Lock the cap, check the screw threads, and use a steady horizontal or wrist-rolling motion for 20 to 30 seconds to break up the powder with minimal foam.
-
Let the bottle rest for 60 seconds before drinking: Setting the shaker down for one minute lets trapped micro-bubbles rise and gives thicker powders time to finish absorbing water. Give the cup one three-second swirl and drink.
Below is the 750ml Shaker Bottle in Blue, which pairs a high-headspace 750ml chamber with a surgical-grade wire blending ball so a 300ml shake has plenty of room to circulate without foaming over.

Liquid ratios and water temperatures for every protein type
Different protein sources absorb water at different rates. Hydrolyzed whey and whey isolate dissolve almost on contact in cool water, whereas micellar casein and pea or brown rice blends absorb liquid slowly and thicken over 10 to 15 minutes.
| Protein Type | Best Mixing Sequence | Liquid Per 30g Scoop | Ideal Liquid Temperature | Best Agitation Method |
| Whey Isolate & Clear Whey | Liquid first, powder second | 250 ml to 300 ml | Cool or room temp (15°C to 25°C) | Shaker bottle with mixing ball |
| Whey Concentrate | Liquid first, powder second | 250 ml to 300 ml | Room temp (20°C to 25°C) | Shaker bottle with mixing ball |
| Micellar Casein | Liquid first + 60-sec rest | 320 ml to 380 ml | Room temp (20°C to 25°C) | Shaker with wire ball + extra headspace |
| Plant-Based / Vegan | Slurry paste or liquid first | 300 ml to 350 ml | Room temp (20°C to 25°C) | Shaker with ice cubes or electric blender |
| Dense Mass Gainer | Half liquid, powder, top up | 400 ml to 500 ml | Room temp water or milk | 750ml shaker with agitator + mixing ball |
Why water temperature and UAE humidity matter
-
Avoid ice-cold water at the start: Very cold water (below 8°C) slows down how fast protein molecules unwind and hydrate, and it causes the natural fats and thickeners in concentrate blends to congeal into tiny beads. In the UAE summer, mix your powder with room-temperature water first so it dissolves cleanly, then drop in two or three ice cubes afterward. Adding ice cubes also gives you a second set of heavy agitators that smash any remaining micro-lumps as you shake.
-
Never shake hot liquids in a sealed bottle: Pouring hot coffee, tea, or boiling water into a closed shaker does two bad things at once. Heat above 65°C denatures whey protein into cooked, curdled strings, and trapped steam builds pressure inside the chamber that can blow the flip cap open mid-shake. If you want protein in your coffee, mix the scoop into 60 ml of room-temperature water first to make a smooth creamer, then pour it into your mug.
-
Protect your tub from coastal humidity: In humid cities like Dubai and Sharjah, opening a protein tub in a warm kitchen lets moisture into the container. Clean-label powders that skip artificial anti-caking agents (like silicon dioxide or soy lecithin) will clump inside the tub if left exposed. Keep the silica gel packet buried in the powder, store the tub in a cool cupboard away from the stove, and fluff compacted powder with a fork before scooping.
What to do if you already put the protein powder in first
Carrying an empty shaker with a dry scoop of whey already inside is convenient when you commute straight from the office to the gym. If your powder is already sitting at the bottom of the cup, do not pour water on top and shake right away.
Use one of these two recovery methods instead:
1. The upside-down palm tap method
-
Pour 300 ml of water into the bottle on top of the dry powder and screw the lid shut tightly.
-
Flip the shaker bottle completely upside down before shaking it.
-
Tap the bottom of the inverted cup firmly with the palm of your hand three or four times.
-
Watch the compacted protein plug break away from the base and drop through the water toward the lid.
-
Shake immediately for 20 to 30 seconds while the powder is suspended in the middle of the liquid.
2. The two-stage slurry paste method
If you are mixing a stubborn vegan blend, collagen powder, or cacao mix without a blender ball, pour only 50 ml to 60 ml of room-temperature water into the cup with the powder. Swirl or stir vigorously for 10 seconds until it forms a smooth, thick paste with no dry spots. Once the paste is uniform, pour in the remaining 250 ml of water and shake for 15 seconds.
For lifters who prefer carrying dry powder in their shaker cup and adding water after training, keeping a high-capacity OG 2.2 Litre Bottle in your gym bag gives you enough water for your workout plus 300 ml left over to pour into your shaker first.

Why your shaker bottle design and material matter
Even when you pour liquid first, the inside geometry and material of your bottle determine whether you get a clean mix or a sour-smelling cup after three weeks of use.
Rounded base vs. flat corners
Cheap promotional shakers have a flat bottom with a sharp 90-degree corner around the edge. A round wire ball cannot reach into a sharp corner, so wet powder collects in that ring. A bottle with a curved, rounded interior base lets the mixing ball roll across every millimeter of the bottom surface.
The 600ml Hydra Shaker Bottle solves the corner-trapping problem by combining a rounded interior floor with a custom contoured blending ball, a wide mouth for easy sponge access, and a one-handed flip-top lid.

Food-grade stainless steel vs. scratched plastic
If you have ever owned a plastic shaker that still smelled like sour milk after three washes, microscratches are the culprit. Over time, scooping, ice cubes, and dishwashers carve tiny grooves into soft plastic where bacteria and old whey fats hide.
Switching to a 100% steel bottle eliminates porous plastic walls completely. Steel does not absorb flavors from pre-workout or chocolate whey, rinses clean with warm soapy water, and keeps chilled shakes cold during the walk from the gym to a parked car in Dubai traffic.
The 750ml Stainless Steel Shaker Bottle includes both a structured mixer ball and a built-in agitator to break down thick mass gainers, creatine, and whey isolates without retaining odors.

Comparing HustlersOnlyUAE shakers and hydration bottles
Every bottle in our Bottles Collection is stocked in the UAE for fast local dispatch. Use the specification table below to match the right bottle to your supplement routine:
| Bottle Model | Capacity | Mixing & Lid Features | Material & Care | UAE Price (Sale / Regular) |
| Stainless Steel Shaker Bottle (Black, Silver, Red) | 750 ml | Metal/structured mixer ball + built-in agitator, leak-proof lid | 100% food-grade steel, odor-free, hand wash only | 89.25 AED (Reg. 105.00 AED) |
| Hydra Shaker Bottle (White, Black, Blue) | 600 ml | Contoured shaker ball, rounded anti-clump base, flip-top lid, carry strap | BPA-free polymer, wide-mouth easy clean | 42.50 AED (Reg. 50.00 AED) |
| Shaker Bottle (Blue, Black, Pink, Red, Neon) | 750 ml | Wire blending ball, screw-tight leak-free lid | 100% dishwasher friendly | 68.00 AED (Reg. 80.00 AED) |
| Sports Water Bottle (Blue, Black, Red, Neon) | 760 ml | Side ml/oz markings, flip lock lid, wrist strap (28 cm x 7.5 cm) | Lightweight polymer, hand wash, cold liquids only | 42.50 AED (Reg. 50.00 AED) |
| OG 2.2 Litre Bottle (Black/Blue, Pink/Blue) | 2,200 ml | High-capacity hydration jug with side volume markers and carry handle | Heavy-duty gym jug for session water + shake refills | 68.00 AED (Reg. 80.00 AED) |
Need a dedicated compartment to keep your shaker upright alongside your lifting belt, straps, and towel? Check out our water-resistant Gym Bags and Athlete Essentials, with free UAE shipping on orders over 500 AED and fast delivery across Dubai, Abu Dhabi, and Sharjah.
Frequently asked questions
Do you put water or protein powder in the shaker first?
Always put water or milk into the shaker bottle first, then add your protein powder on top. Pouring liquid first prevents dry powder from compressing into the bottom corners of the bottle and lets the particles hydrate from all sides as soon as they touch the water.
Can I mix my protein shake in advance and drink it later?
Yes, you can mix a shake using the liquid-first method, seal the lid, and store it in the refrigerator for up to 12 to 24 hours. The liquid and solids will naturally settle over time, so keep the mixing ball inside the bottle and give it a quick 10-second shake right before drinking. In warm climates like the UAE, never leave a pre-mixed milk shake inside a hot car or gym bag for hours, as dairy spoils rapidly in heat.
Does it matter whether I use milk or water for the mixing order?
No, the liquid-first rule applies to water, dairy milk, and plant-based milks like almond or oat milk. Water mixes faster, digests quickly after training, and keeps calories low during a fat-loss phase. Milk creates a thicker, creamier shake with extra protein and calories suited for muscle-building phases, though it requires an extra 5 to 10 seconds of shaking and immediate rinsing afterward so milk fat does not sour inside the bottle.
Why does my protein shake still go lumpy even when I add water first?
If your shake still clumps when adding liquid first, one of three things is happening: you are using less than 250 ml of liquid per scoop, your bottle is missing a wire mixing ball or agitator, or you are filling the shaker all the way to the brim so the liquid has no empty headspace to move. Leave at least 150 ml of air space at the top of a 600 ml or 750 ml shaker and shake for a full 20 to 30 seconds.
How do you stop a protein shaker from smelling bad?
Rinse your shaker bottle with warm water immediately after finishing your shake so wet protein residue cannot dry onto the walls. Wash the bottle, cap, and screw threads daily with warm soapy water, and store the bottle with the lid off so air can circulate. If plastic odors persist, switch to a 100% stainless steel shaker bottle, which lacks the microscopic surface scratches that trap bacteria.
Share:
Elbow Sleeves vs Elbow Wraps vs Arm Sleeves: Which Do You Need?